How to post data to Airtable using an Axiom.ai automation
Follow these steps to post data from Axiom.ai to Airtable using a webhook. Axiom.ai allows you to use webhooks to send data to external APIs, including Airtable's API. To make the integration work, you will need to configure your credentials in Airtable, and in Axiom.ai, you will need to create your post request using JavaScript.
This guide assumes you are familiar with both Axiom.ai and Airtable and have a basic understanding of JavaScript.
# Getting started
To get started, you will need the following from the Axiom.ai Chrome extension:
- API key - The API key is found on the dashboard.
- Automation name - Get the name of the automation you wish to trigger.
- Endpoint - The current endpoint is
https://lar.axiom.ai/api/v3/trigger.
You'll also need information from Airtable:
- Base ID - Head to the Airtable API page (opens new window) to grab your "Base ID". Your ID will look something like "appFrf1jmiyIq5nuJ". You can also find this in the URL of your base.
- Table name - Open your Airtable base, the tab names will be the table name that you need to use.
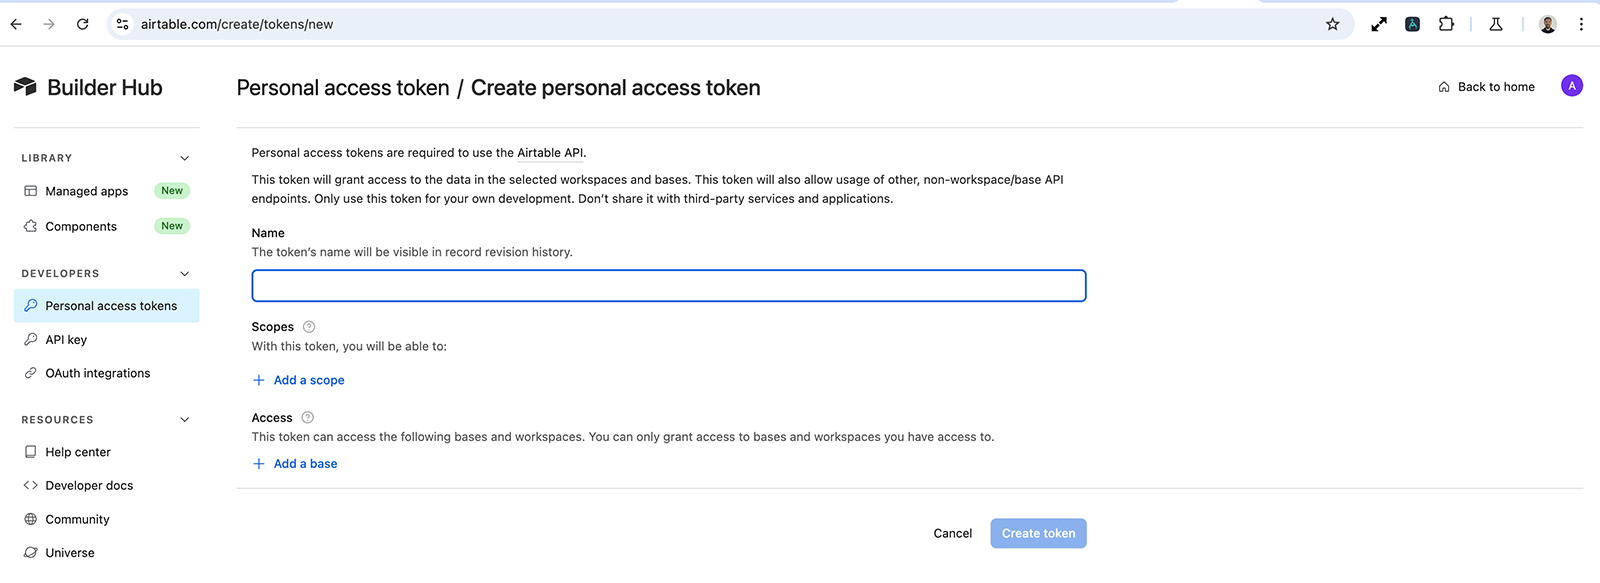
Create a personal access token via the Airtable Developer Hub.
- Personal access token - Open the personal access token (opens new window) page.
- Create new token - Click on the button "create a new token."
- Name - Name your new token.
- Scopes - Set the scope to "data.records:write".
- Access - Select the Base you wish to add records to.
- Create token - Create the token, copy it for later.
# Sending data to Airtable using an Axiom.ai automation
Learn how to get started with sending data from your Axiom.ai automation to Airtable.
# Set up your Axiom.ai automation
Create your automation as per usual. When you need to send data to Airtable, add a write JavaScript to your automation. Follow the guides below to determine which script you'll need to send along your data to Airtable.
# Create a single record
The following code will create a single record in Airtable. You'll need your credentials from the Getting Started section to begin. You'll need to modify the attributes in the recordData array with this data. When scraping, ensure that the max results option is set to 1.
- Add credentials - Insert base ID, table name, and personal access token into the script.
- Field names - Edit the field names in
recordDatato match your table. - Field values - Insert Axiom.ai data tokens for the value of each field, replacing the examples. Tip: use the 'insert data' button to do this step.
// Airtable API endpoint URL
const AirtableBaseId = '*******'; // Add Base ID
const AirtableTableName = '************'; // Add table name
const AirtableAccessToken = '**********'; // Add personal access token
const AirtableUrl = `https://api.Airtable.com/v0/${AirtableBaseId}/${AirtableTableName}`;

// Data you want to send (adjust according to your Airtable fields)
const recordData = {
  fields: {
    "Customer Name": '[scrape-data?all&0]',  // Replace field and token
    "Email Address": '[scrape-data?all&1]',  // Replace field and token
    "Phone Number": '[scrape-data?all&2]',   // Replace field and token
    "Customer ID": '[scrape-data?all&3]'     // Replace field and token
  }
};

// Send data to create a single record in Airtable.
async function sendToAirtable(data) {
  try {
    const response = await fetch(AirtableUrl, {
      method: 'POST',
      headers: {
        'Authorization': `Bearer ${AirtableAccessToken}`,
        'Content-Type': 'application/json'
      },
      body: JSON.stringify(data)
    });

    if (response.ok) {
      const jsonResponse = await response.json();
      console.log('Record added successfully:', jsonResponse);
    } else {
      console.error('Error adding record:', response.statusText);
    }
  } catch (error) {
    console.error('Error with request:', error);
  }
}

// Call the function to send the record to Airtable
sendToAirtable(recordData);
# Create multiple records (up to 10)
The following code will create multiple records in Airtable. You'll need your credentials from the Getting Started section to begin. You'll need to modify the attributes in the recordData array with this data. When scraping, ensure that the max results option is set to 10. Airtable's API limits records created per call to 10.
- Add credentials - Insert base ID, table name, and personal access token into the script.
- axiomData - Remove example token and insert your own. Tip: use the 'insert data' button to do this step.
- Field names - Edit the field names in "recordsToSend", to match your table.
// Airtable API endpoint URL
const AirtableBaseId = '*******'; // Add base ID
const AirtableTableName = '************'; // Add table name
const AirtableAccessToken = '**********'; // Add personal access token
const AirtableUrl = `https://api.Airtable.com/v0/${AirtableBaseId}/${AirtableTableName}`;

// Replace the token used in this variable
const axiomData = [scrape-data];

// Data you want to send (adjust according to your Airtable fields)
const recordsToSend = axiomData.map((row) => {
  return {
    fields: {
      "Customer Name": row[0],
      "Email Address": row[1],
      "Phone Number": row[2],
      "Customer ID": row[3]
    }
  };
});

// Send data to create multiple records in Airtable.
async function sendToAirtable(records) {
  try {
    const response = await fetch(AirtableUrl, {
      method: 'POST',
      headers: {
        'Authorization': `Bearer ${AirtableAccessToken}`,
        'Content-Type': 'application/json'
      },
      body: JSON.stringify({
        records: records // Send multiple records in one request
      })
    });

    if (response.ok) {
      const jsonResponse = await response.json();
      console.log('Records added successfully:', jsonResponse);
    } else {
      console.error('Error adding records:', response.statusText);
    }
  } catch (error) {
    console.error('Error with request:', error);
  }
}

// Call the function to send the records to Airtable
sendToAirtable(recordsToSend);
# Create multiple records (more than 10)
To get around Airtable's API limit of 10 records per API call, you can batch your requests. Let's review how we can do this.
- Add credentials - Insert base ID, table name, and personal access token into the script.
- axiomData - Remove example token and insert your own.
- Fields - Edit the fields in "recordsToSend", to match your table.
// Airtable API endpoint URL
const AirtableBaseId = '*******'; // Add Base ID
const AirtableTableName = '************'; // Add Table Name
const AirtableAccessToken = '**********'; // Add Personal Access Token
const AirtableUrl = `https://api.Airtable.com/v0/${AirtableBaseId}/${AirtableTableName}`;

// Replace the token used in this variable
const axiomData = [scrape-data];

// Data you want to send (adjust according to your Airtable fields)
const recordsToSend = axiomData.map((row) => {
  return {
    fields: {
      "Customer Name": row[0],
      "Email Address": row[1],
      "Phone Number": row[2],
      "Customer ID": row[3]
    }
  };
});

// Send data to create multiple records in Airtable.
async function sendToAirtable(records) {
  try {
    const response = await fetch(AirtableUrl, {
      method: 'POST',
      headers: {
        'Authorization': `Bearer ${AirtableAccessToken}`,
        'Content-Type': 'application/json'
      },
      body: JSON.stringify({ records })
    });

    if (response.ok) {
      const jsonResponse = await response.json();
      console.log('Records added successfully:', jsonResponse);
    } else {
      console.error('Error adding records:', response.statusText);
    }
  } catch (error) {
    console.error('Error with request:', error);
  }
}

// Function to batch and send records in chunks of 10
async function sendInBatches(records, batchSize = 10) {
  for (let i = 0; i < records.length; i += batchSize) {
    const batch = records.slice(i, i + batchSize); // Get a batch of up to 10 records
    console.log(`Sending batch ${Math.floor(i / batchSize) + 1}`);
    await sendToAirtable(batch); // Send the batch to Airtable
  }
}

// Call the function to send the records to Airtable in batches
sendInBatches(recordsToSend);
# Testing your workflow
If you encounter problems, check the console log in the runtime browser to view the error message. It may also be worth checking that the credentials have been added correctly.
- Check for console logs in the runtime browser.
- Ensure your credentials are correct.
- Make sure all field names match exactly with your Airtable table.
# Wrapping up
You can easily send a single record from Axiom.ai to Airtable using javascript and Airtable's rest api. Adjust the data format to match the fields in your Airtable table, and the bot will automatically push the collected data. To send multiple records, you will need a different format for the post request. Airtable also limits records being added to 10 rows only; to get around that, you can use the batching method found in the guide.