How to trigger Axiom.ai automations using Power Automate
Power Automate offers a powerful Windows experience to build out automations for your desktop applications. When paired with Axiom.ai automations there is nothing that you can't automate in order to power up your workflows.
This guide assumes that you already have an automation set up, want to create a trigger using Power Automate, and have an Axiom.ai plan that supports webhooks.
# Getting started
To get started, you will need the following from the Axiom.ai Chrome extension:
- API key - The API key is found on the dashboard.
- Automation name - Get the name of the automation you wish to trigger.
- Endpoint - The current endpoint is
https://lar.axiom.ai/api/v3/trigger.
# Trigger an Axiom.ai automation with Power Automate
Learn how to trigger your Axiom.ai automations with Power Automate. The methods vary depending on if you are using desktop or web so be sure to select the right instructions before continuing.
# Triggering with the Power Automate desktop app
You will first need to ensure you have installed Power Automate (opens new window) from the Microsoft Store.
- New flow - Open Power Automate, tap "+ New flow" to create a new flow.
- Configure - You can add any number of steps to your flow, or use an existing flow to trigger your Axiom.ai automation.
- Invoke web service - Search for the "invoke web service" action, add this to your flow.
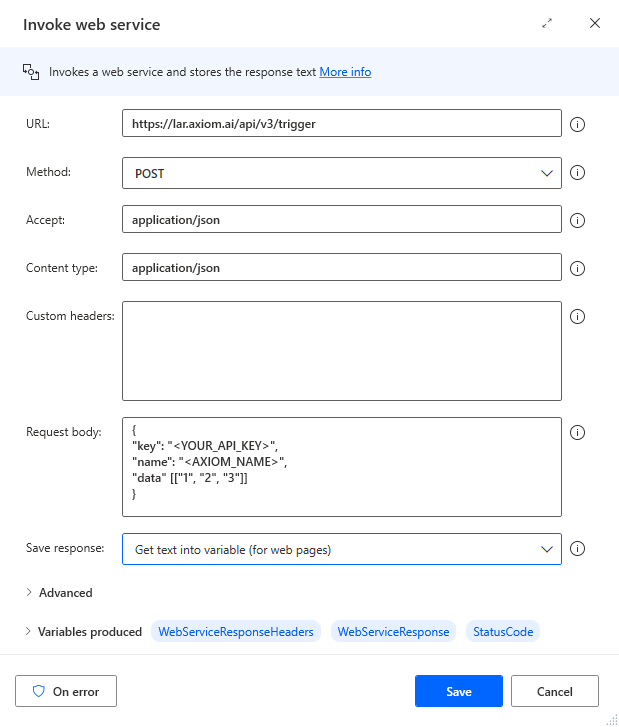
To configure the invoke web service action, you'll need to enable the following:
- URL - The current endpoint is
https://lar.axiom.ai/api/v3/trigger. - Method - Set to
POST. - Accept - Set to
application/json. - Content Type - Set to
application/json. - Request body - This should be set to the per our API | Triggering an automation documentation.
- Encode request body - This should be disabled.
# Triggering with the Power Automate web app
You can access Power Automate (opens new window) on the web. This requires a paid subscription with Power Automate.
- Create a new flow - Open Power Automate (opens new window) on the web, create a new "instant-" or "scheduled cloud flow".
- Select trigger - Set to your desired trigger - this guide will focus on the "manually trigger a flow" option.
- Add HTTP action - Click "new step" and search for the HTTP action.
To configure the HTTP action, you'll need to enable the following:
- URL - The current endpoint is
https://lar.axiom.ai/api/v3/trigger. - Method - Set to
POST. - Headers - Set to
Content-Type: application/json. - Request body - This should be set to the per our API | Triggering an automation documentation.
# Trigger a Power Automate flow with an Axiom.ai automation
This guide is only applicable to Power Automate (opens new window) on the web. Power Automate's desktop app currently does not support triggers via webhook.
- Create a new flow - Open Power Automate (opens new window) on the web, create a new "instant-" or "scheduled cloud flow".
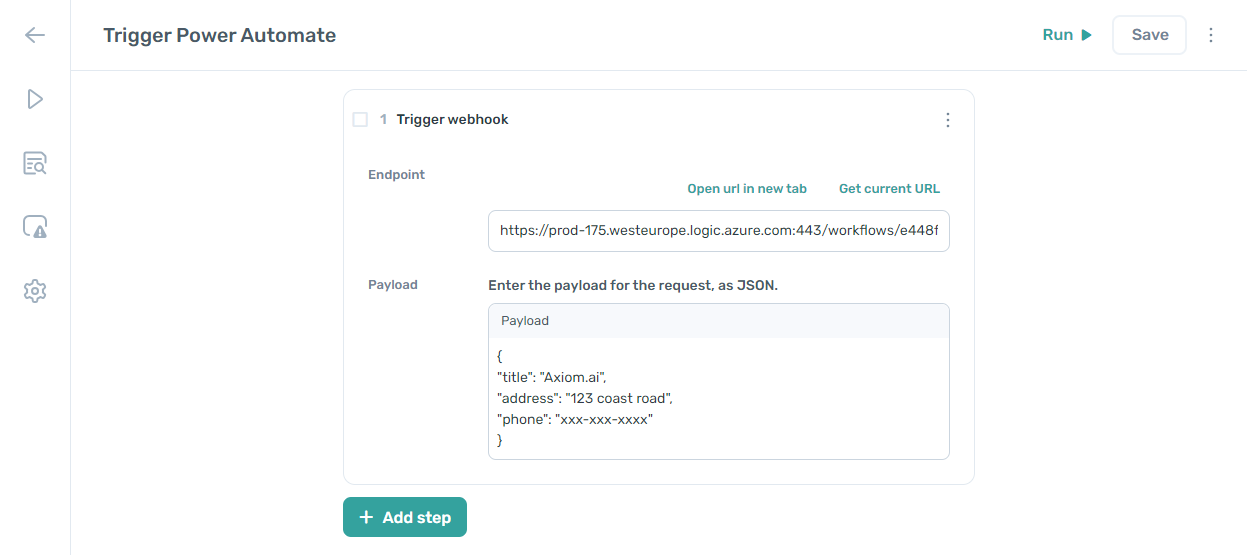
- Select trigger - Set your trigger to "when a HTTP request is received".
- Configure - Set the "when a HTTP request is received" action to allow for triggering from "anyone". Note: consider your organisations security needs before enabling this. Optionally, you can set a "request body JSON schema".
- Save & get URL - Save your flow to generate the webhook URL, save this for later - this will be unique for your flow.
- Open your Axiom.ai automation - Head back into Axiom.ai and open the automation you'd like to use to trigger your Power Automate flow from.
- Trigger a webhook - Add a "trigger a webhook" step to your automation, using the webhook URL provided by Power Automate. You can also send a payload based on the payload schema set up in Power Automate.
# Testing your workflow
Now that you've built out your entire workflow, you can test it!
- Trigger Axiom.ai automation - Open the Power Automate flow you have created to trigger your automation. Hit "Run".
- Open Axiom.ai - Head into your Axiom.ai extension - you may already see that your automation is running. If this has completed, you'll find the run report in the "run reports" section of the dashboard.
If you find that the automation has not run, and is not present in the "run reports", this would mean that the automation has failed to start. Review your Power Automation flow for any error messages that may have been raised.
# Wrapping up
Being able to trigger Axiom.ai automations with Power Automate flows, and being able to trigger Power Automate flows with Axiom.ai automations, offers a huge range of possiblilities for organisations to power up their workflows.
Information valid as of 22nd October 2024..